E3D Volcano Titan Aero PRO toolhead for Lulzbot TAZ

Rated 5.00 out of 5 based on 2 customer ratings

$426.25$457.75

MAKE HIGH SPEED STRONG FUNCTIONAL PRINTS WITH YOUR TAZ

  • Simple installation- Bolt it on, plug it in, flash firmware, adjust ESTEPs, and PRINT! *
  • Compatible with LulzBot® TAZ 6 auto leveling
  • Available in 3mm and 1.75mm

* Yes, really! There are a few adjustments that are necessary for printing with flexible filament or 1.75mm filament. We have good guides for all those below.

Subtotal:

Add-ons total:

Total:

SKU: 11340 Categories: , Tags: , , , ,

Description

PRINT IN ABRASIVE MATERIALS WITH SPEED AND STRENGTH!!!

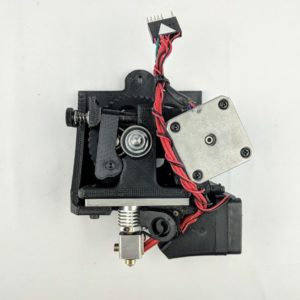
IT-Works developed this toolhead for the LulzBot® TAZ around the E3D Titan Aero extruder and Volcano hot end to give you the ability to print high speed strong prints. It does this by using a 1.2mm nozzle, which allows thicker layer heights of .3mm-.8mm or more, printing upwards of 80-100grams per hour. The thicker layer width requires fewer passes to achieve thick shells, and the larger filament extrusion makes for stronger prints with better adhesion between layers.

9″ / 225mm tall 200 gram vase printed in 2 hours with the IT-Works E3D Volcano Titan Aero toolhead for Taz. Vase design is Benito Sanducci’s Gosper Fractal Vase.

Benefits include:

  • Printing Abrasive materials, high strength materials would normally cause wear and tear on normal toolhead equipment
  • Built in LED for easy layer viewing and a High Visibility 360 degree cooling duct
  • Precision machined gears ensure accurate ESTEP calibration, and make for more consistent performance over time
  • Surround cooling duct improves print performance. Here’s a real world example E3D Titan Aero duct improves print performance
  • Titan Aero is built on the E3D V6 all metal design, allowing you to reliably print any thermoplastic at temperatures of more than 300°C.
  • It’s also been designed to take standard V6 heatbreaks, so that you can interchange components from E3D’s entire modular ecosystem to suit your needs.
  • 40W heater included for fast heat times, and full melting capabilities
  • Available for 1.75mm filament, giving you a wider filament selection. Consider going this route. Cura 3.XX makes it easy to set up a machine and profiles for 1.75mm

The included nozzle size is 1.2mm

Includes a Heardened Hobb Gear, Hardened E3D Nozzle, and either a Titanium Heat break or a Micro Swiss Wear Resistand Heat tube, depending on the filament size.


– 24V power supplies (all TAZ 3,4,5,6)
– Flash printer to LulzBot®’s MOARSTRUDER Hexagon Firmware for TAZ 5 and TAZ 6 with firmware update with Cura LulzBot® Edition)
– V2C toolhead connector

60 day warranty and support from IT-Works
*** This is not a LulzBot® product and LulzBot® does not support or warranty this toolhead ***

For best results with your toolhead, please follow the guides below

Q&A:
How to order with upgraded parts

Add all the items you want with your toolhead to the cart(Hardened Hobb Gear, Hardened Nozzle, Either a Titanium Heat Break for 1.75 and Wear Resistant Heat Break for 3mm, all necessary parts for printing abrasive material).

We keep the original parts and install your parts.  Simple as that, with no extra labor cost involved.

Please allow up to 2 days for your toolhead to be built and tested.

Q: Can I just turn the feed rate up on the LCD 10% for semi-flexible and 25% for flexible filaments?

A: We suggest starting with higher base ESTEPs first. You can use the feed rate knob to fine tune extrusion.

Q: If I have a 3mm Titan Aero, can I print 1.75mm filament?

A: You can, but with a few qualifications.
- Ideally (but not required) you swap the E3D 3mm filament guide for a 1.75mm filament guide https://itworks3d.com/product/e3d-filament-guide-titan-titan-aero/
- Don't print 1.75mm flexible filaments in a 3mm Titan Aero. The heatbreak and hotend would still be 3mm, making room for flexible 1.75 to coil and bunch up
- You'll need to experiment with flow and retraction retraction settings.

Q: Can I print faster with the Titan Aero toolhead without losing quality?

A: Testing has shown very good results with 50-100% faster print speeds, Try it!

Q: Where are the files for the printed parts?
Q: How about versions for the LulzBot Mini and dual/multiple filaments?

A: Here's the: E3D Titan Aero Toolhead for LulzBot Mini, we don't plan to offer a Mini Volcano though.
We now offer the Palette+ 4 filament system.  Check it out for use with your Mini or Taz 4/5 or 6.  Only for 1.75 filament.

Q: What parts do I need to build my own E3D Titan Aero toolhead for the LulzBot TAZ?

1 E3D TITAN AERO EXTRUDER 24V Mirrored
1 .5mm E3D V6 nozzle (a .4mm nozzle is included with the Titan Aero Extruder, if that works for you)
1 2x8 dual row connector housing
15  CONN PIN 24-30AWG CRIMP TIN Type Molex 0016020108 Male. Buy extras though if you're new to crimping these. We've found a PAD-11 crimper to be a good choice to crimp them.
FAN BLOWER 51.3X15MM BALL BEARING 24V RADIAL
1 FAN 40X10MM 5V AXIAL
1 MICRO SWITCH
FULL HEIGHT NEMA 17 STEPPER MOTOR. You CAN use half height stepper motors (and potentially even pancake steppers), but we've found them to not have enough torque in some situations.
1 screw kit
2 CONN QC RCPT 22-26AWG 0.110 (24-26awg insulated spade lugs. We use TE Connectivity 7-520366-2
1 CONN RING CIRC 22-26AWG #4 CRIMP We use Panduit P22-4R-M

Installing, Using, and Maintaining the LulzBot® TAZ E3D Titan Aero toolhead:
Unloading filament
  • Video: How to Unload filament with the E3D Titan Aero
  • Heat the hotend to a suitable filament change temperature- 200C is good for ABS, PLA, PETG, TPU
  • To load filament, squeeze the idler block to release tension.  Push filament down all the way into the extruder until you see filament comes out the nozzle.  You can extrude filament if you are changing colors to get the old color out of the hotend.
  • To Remove Filament, Have your hot end to temperature, again squeeze the idler block to remove tension, manually push a bit of filament down into the hotend and quickly pull the filament out of the extruder.  If you fail to do so quick enough there could be a blob that may get stuck in the extruder causing you to have to take the unit apart.
  • Be sure to not leave PLA sitting stationary in a heated hotend, or to heat it past recommended temperatures, as this can cause crystallization, possibly requiring replacement parts.
Uninstalling a toolhead on the LulzBot TAZ
  • Unload filament from the installed toolhead
  • Note the ESTEPS for the current toolhead if you don't know them- Step 9 in LulzBot's toolhead calibration guide. We suggest labeling the toolhead for future reference.
  • Note the ESTEPs on the label on the E3D Titan Aero toolhead- either on the back or on the stepper motor.
  • Turn off power to the printer
  • Unplug the V2C toolhead connector from the toolhead harness
  • Don't get burned! If the hotend was heated, wait for it to cool to a safe handling temperature.
  • While supporting the toolhead, remove the screw at the top of the toolhead mounting plate that secures the toolhead to the X carriage
  • Slide the toolhead up and then toward you to remove it from its mounting bracket
Installing a toolhead on the LulzBot TAZ
  • Hold the toolhead with the back plate vertical
  • (first time install on a TAZ 5) replace the X carriage guide with the included blue printed TAZ 6 style x carriage guide to make clearance for the X max switch.
  • Insert the V wedge at the bottom of the toolhead back plate into the V shaped mounting bracket on the X carriage
  • Press down toward the bed with moderate pressure to seat the V wedge in the mounting bracket.
  • While supporting the toolhead, insert the mounting screw through the hole at the top of the toolhead mounting plate and thread it in to the brass insert in the X carriage until it is snug.
  • Plug the V2C toolhead connector into the toolhead harness, taking care to insert the pins straight and into their correct mates
  • Turn the printer on and check that the heat sink cooling fan on the right is spinning.  It should be spinning whenever the printer is turned on. If it is not spinning, turn the printer off and double check that the V2C connector is plugged in correctly.
  • If the heatsink cooling fan is spinning, either set up the toolhead in Cura, or select the correct machine for the filament you are using in Cura, then load filament
  • (TAZ 5) loosen the Z minimum knob significantly to ensure the nozzle doesn't run into the bed the first time you home it. Tighten the Z minimum knob and home Z repeatedly until the nozzle is the correct height over the bed.
Install Cura 2
  • Download Cura 2 from https://www.lulzbot.com/cura
  • At first run, you'll be asked to Add Machine, select: LulzBot TAZ6 Moarstrder, or Taz 5 Moarstruder, as appropriate
  • To add a machine after first run: Settings > Printer > Add Printer
  • At the bottom of the window, give it a descriptive name, especially if you're using 1.75mm filament or other nozzle sizes.
  • Click Add Printer
  • Set the filament size (1.75mm or 2.85mm) and nozzle size (1.2mm is stock) you purchased
  • Click Finish
  • Click Close
Flash Firmware
  • From Cura 2 LulzBot Edition, available at lulzbot.com/cura
  • Select the correct printer from the pulldown in the upper right
  • Settings > Printer > Manage Printers
  • Check that the correct printer is highlighted under the Printers list
  • Turn the printer on
  • Connect the printer to the computer with a USB cable
  • Click Upgrade Firmware
  • Click Upgrade Firmware Automatically
  • Wait for the firmware to flash, click OK and close as needed when it's done.
  • Be sure to update ESTEPS, 415 is good for all E3D Titan Aero toolheads. Make sure this is correct for your machine, filament and toolhead by performing and ESTEPS calibration
Update ESTEPs and ESTEP Calibration

For proper operation, the ESTEPS for every toolhead need to be and stored in the printer.

Change and save ESTEPS of 415 using the instructions in this handy video Video: How to store ETEPS in a LulzBot TAZ 3D printer

(Optional) Calibrate ESTEPS:
For best operation, it's a good idea to calibrate the ESTEPS to minimize under or over-extrusion

To calibrate ESTEPS:

  1. Open Cura
  2. Load a model (it doesn’t matter what)
  3. Open the Control window
  4. Heat up the nozzle to the proper printing temperature for your filament
  5. Load your filament using the extrude 10mm button- around 50mm should do it.
  6. Mark the filament at 100mm and 120mm above the idler
  7. In the lower right of the control window, there is a white text box where you type in the appropriate Gx Fxx Exxx (USE CAPITAL LETTERS) below, then press enter
  8. G92 E0
  9. For Flexible filament: G1 F30 E100
  10. For Solid filament: G1 F50 E100

Fxx is the feed rate in mm, Exx is the length of filament to extrude. It’s also good idea to calibrate your other toolheads, if you’ve not done so.

  1. The toolhead will extrude, then stop.
  2. Make note of how high or low above the toolhead the 100mm mark fell. If it over-extrudes past the 100mm mark, you can measure to the 120mm mark to gauge how much it over-extruded
  3. Adjust the ESTEPS, increase or decrease them approx. 6 steps per 1 mm of under or over-extrusion, then save them to the printer:
    1. M92 Exxx
    2. (this sets the new ESTEPS. E400, E432, E411, etc)
    3. M500
    4. (this saves the ESTEPS to the printer)
    5. M501
    6. (this displays the settings, check that your new ESTEPS are saved)
  4. Close the control window
  5. Repeat from step 3 until the 100mm mark reaches the point you measured from (the toolhead is extruding 100mm)

Repeat this process for flexible filament you use. We have found that ESTEPs may vary depending on the flexibility of the filament used, so it’s a good idea to calibrate ESTEPs for your filament.

Loading Filament
  • Video: How to load filament with the E3D Titan Aero
  • Heat the hotend to a suitable filament change temperature- 200C is good for ABS, PLA, PETG, TPU
  • Trim the end of the filament square
  • Ensure the tension knob is set properly- approx 2 turns from fully loose for solid filaments. Some flexibles need another 1-2 turns tighter.
  • Push the filament in through the hole in the filament lever until it is pressing with moderate pressure against the hobbed bolt below the filament lever
  • In Cura, or from the TAZ LCD, extrude approx 100mm of filament until the new filament pushes the prior filament out through the nozzle. This is known as "purging" the old filament.
  • Push the filament down into the idler until the hob has grabbed the filament and is feeding the filament.
  • Be sure to not leave PLA sitting stationary in a heated hotend, or to heat it past recommended temperatures, as this can cause crystallization, possibly requiring replacement parts.
  • We do not recommend manually inserting or removing filament, as improper removal can result in jamming
Setting the E3D Titan Aero Filament Tension knob
  • We have found that a good starting tension knob adjustment is 1.5 turns for hard filament and 2-3 turns for softer filaments.
  • Per the E3D Titan Aero Wiki's "Adjusting Idler Force" section: "The idler force can be adjusted using the thumb wheel on the side of the extruder. The nut and spring that actually apply the force can be viewed through the lid, giving a quick indicator of the force being applied. The force required will depend on a range of parameters, such as filament material, filament diameter, extrusion rate etc. As a general rule softer filaments (such as flexibles) will need less force than harder ones as the hobb can more easily grip them. The idler force does not need to be perfect in order to print, however to get the best settings for your printer and material combination we advise a little bit of experimentation to find a setting that feels right."
1.75 Filament Profile Adjustments for Cura

- Change the filament diameter in your Cura profiles to 1.75

- For the Taz 6, reduce retraction distance by half or more to avoid retracting the filament up into the heat break or filament guide. Do this in the Start .Gcode section- change the line G1 E-30 F100 to G1 E-15 F100

- Save the filament profile for later use

How to change nozzle on the E3D Titan Aero hotend

To swap out a nozzle, you must follow this procedure - being careful not to burn yourself.
Here's a video on How To Remove and E3D Nozzle

  • Unscrew the heat-break from the HeatSink half a turn to be sure you are not tightening against the heat-break in later stages.
  • Heat up your HotEnd to 285°C. Do not overshoot as you risk damaging your thermistor.
  • Remove the existing nozzle from the heater block.
  • Insert the new nozzle.
  • Gripping the heater block tighten the nozzle. Do not apply any torque through the heat-break, they are fragile.
  • Turn off the heat and allow the HotSide to cool.
  • Re-tighten the heat-break into the HeatSink.
Removing Stuck Filament

Heat the hotend to printing temperature for the loaded filament

Loosen the idler tension knob all the way by turning clockwise until it stops

Pull the idler toward you so it's no longer pressing the filament against the hob gear

Try pushing the filament through manually.

If you can get push the filament through through, check the hob for plastic debris and clean as necessary (be sure to rotate it to see all the ridges)

Tighten the idler tension bolt again around 1.5 turn CCW

From the LCD or Cura, extrude around 40mm of filament to purge the filament

To remove the filamant after purging: From the LCD or Cura, retract around 40mm of filament, pulling up on the filament with moderate force to ensure the filament is fully removed from the idler which prevents blobs of filament hardeneing between the idler bottom and hob gear, preventing removal in the future.

If these steps fail, there may be a filament frangment stuck in the filament path. Try disassembling the toolhead to clear the filament path.
Here's a video on How To Disassemble the IT-Works Titan Aero Toolhead

For additional great information, visit E3D’s Titan Aero Wiki

Additional information

Weight N/A
Dimensions N/A
Diameter

1.75mm, 3mm

2 reviews for E3D Volcano Titan Aero PRO toolhead for Lulzbot TAZ

  1. Rated 5 out of 5

    eobrien

    Got this toolhead around 6 months or so and just had to come back to relay how much of great addition to my printing arsenal this has been. I use a .8mm nozzle and have been using this create functional pieces while cutting my print times in half and increasing the strength dramatically. Couldn’t be happier!

  2. Rated 5 out of 5

    haha (verified owner)

    I’ve only used this toolhead for a few weeks, but with all the plastic I’ve pushed through it, it seems like it’s been years! Tons of high quality prints have come of the print bed since this toolhead acquisition. I have the 1.2mm Nozzle X (professionally installed by the It-Works 3D team) and it performs like a gem. This thing is so reliable, so well-supported and is dead easy to install on the Taz 6. It honestly performs better than the stock/OEM MOARstruder, and has a wider array of nozzle sizes and options to choose from. Thanks to Zach and the rest of the IW3D team for creating a killer product at a reasonable price point!

Add a review

This site uses Akismet to reduce spam. Learn how your comment data is processed.

Content missing